Going live on Facebook offers an unparalleled opportunity to engage with your audience in real time, allowing you to create a dynamic and interactive experience that can significantly boost your brand’s visibility and foster stronger connections with your followers. Whether you’re launching a new product, hosting a Q&A session, or giving a behind-the-scenes look at your operations, live video provides a unique platform to showcase your personality, respond instantly to viewer questions, and create a sense of community around your brand. This real-time interaction not only enhances engagement but also builds trust and authenticity, making your audience feel more connected to you and your content. With the right preparation and strategy, going live can become one of the most powerful tools in your social media arsenal, helping you to not only reach a wider audience but also to deepen your relationship with your existing followers. How to make live video on Facebook? Here’s a step-by-step guide to help you make the most out of your Facebook Live sessions and ensure that your broadcasts are as effective and engaging as possible.
Preparing for Your Live Video: Setting the Stage

- Plan Your Content
- Choose a Topic: Select a topic that resonates with your audience. Whether it’s a Q&A session, product demonstration, or behind-the-scenes look, make sure your content is relevant and engaging.
- Outline Key Points: Prepare a basic outline to keep your live video on track. This will help you stay focused and cover all essential topics during the broadcast.
- Set Up Your Equipment
- Camera and Microphone: Use a good quality camera and microphone to ensure clear visuals and sound. If you’re using a smartphone, make sure it’s positioned steadily, either handheld or with a tripod.
- Lighting: Ensure your environment is well-lit. Natural light or a ring light can enhance video quality, making your Facebook live stream more professional.
- Test Your Internet Connection
- Stable Connection: A stable internet connection is crucial for a smooth live stream. Test your Wi-Fi or mobile data before going live to avoid interruptions.
- Backup Plan: Have a backup device or connection ready in case of technical difficulties.
Going Live: Engaging Your Audience
- Start Your Live Broadcast
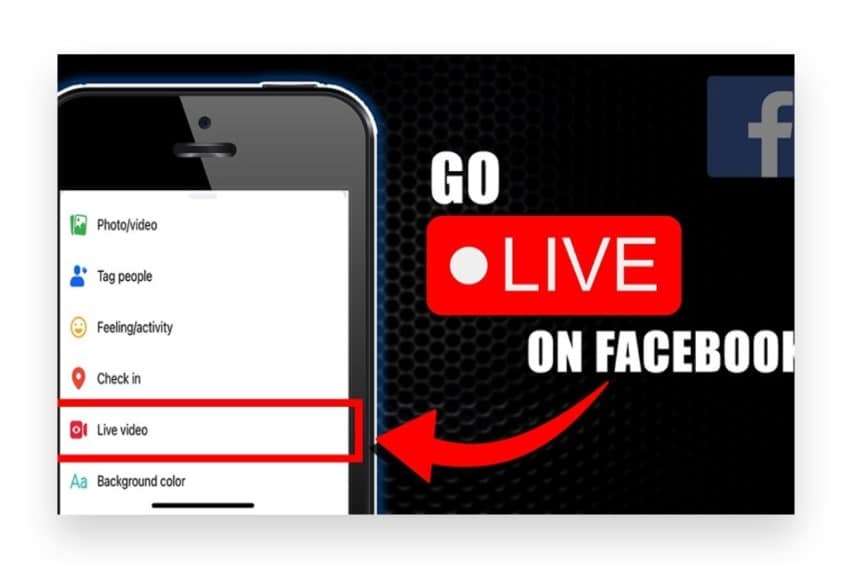
- Open Facebook: Navigate to your Facebook page or profile. On the top of your News Feed, tap on the “Live” button.
- Write a Compelling Description: Before going live, add a brief description of your broadcast. This will appear in your followers’ feeds, so make it attention-grabbing and informative.
- Interact with Your Viewers
- Acknowledge Early Viewers: Greet viewers as they join and encourage them to interact with you by leaving comments or reactions.
- Answer Questions: Take time to answer questions in real time. This interaction helps keep your audience engaged and makes the live video more dynamic.
- Encourage Sharing: Politely ask your viewers to share the live video to help spread the word and increase your reach.
- Maintain Energy and Focus
- Stay Engaged: Keep your energy levels up throughout the broadcast. Your enthusiasm will keep viewers interested and engaged.
- Stick to the Outline: Follow the outline you prepared but be flexible enough to go with the flow if the audience interaction leads in a different direction.
Post-Live Actions: Maximizing Your Video’s Reach
- Save and Share the Replay
- End the Live Stream: Once you’ve covered all your points, thank your viewers, and end the broadcast by tapping “Finish.”
- Post the Replay: Facebook automatically saves your live video as a post on your page or profile. Share the replay link on other social media platforms to attract more viewers who couldn’t join live.
- Engage with Replay Viewers
- Respond to Comments: Even after the live session ends, continue engaging with viewers by responding to comments on the replay.
- Pin the Video: Pin your live video to the top of your page to ensure it gets maximum visibility.
- Evaluate and Optimize
- Analyze Performance: Use Facebook Insights to evaluate how your live video performed. Check metrics like viewer count, engagement, and audience retention.
- Get Expert Feedback: If you want to improve future broadcasts, consider seeking advice from social media experts. They can help you optimize your content, improve technical aspects, and better engage your audience.
Creating a live video on Facebook is a powerful way to engage with your audience in real time. Here’s a step-by-step guide on how to make a live video on Facebook:
Prepare for Your Facebook Live Video

a. Plan Your Content
- Define Your Purpose: Determine the goal of your live video. Are you trying to inform, entertain, promote a product, or interact with your audience?
- Choose a Topic: Pick a topic that will resonate with your audience. Make sure it’s relevant and engaging.
- Outline Your Structure: Plan the flow of your video. Decide on the key points you’ll cover, any visuals or demonstrations you’ll include, and how you’ll interact with viewers.
b. Set Up Your Equipment
- Device: You can go live on Facebook using a smartphone, tablet, or computer. Smartphones are the most common choice due to their ease of use and mobility.
- Lighting: Ensure you have good lighting. Natural light works well, but if you’re indoors, consider using softbox lights or ring lights.
- Sound: A quiet environment is crucial for clear audio. Consider using an external microphone for better sound quality.
- Internet Connection: Ensure you have a stable internet connection. A strong Wi-Fi connection or a reliable mobile data plan is essential to avoid interruptions.
Go Live on Facebook
Using the Facebook App on Mobile
a. Start Your Live Video
- Open Facebook App: Launch the Facebook app on your smartphone or tablet.
- Go to Your Profile or Page: Navigate to your personal profile, business page, or group where you want to go live.
- Tap on ‘Live’: On your profile or page, tap the “Live” option under the post creation area. On the app’s homepage, you can also tap the “What’s on your mind?” field, then select “Live Video.”
b. Set Up Your Live Video
- Add a Description: Write a compelling description for your live video. This helps attract viewers and gives them an idea of what to expect.
- Tag People and Add Location: You can tag friends or collaborators, and add a location if it’s relevant to your live stream.
- Set Privacy Settings: Choose who can see your live video. Options include Public, Friends, Friends except…, Specific friends, or Only me (for practice).
c. Customize Your Live Video (Optional)
- Filters and Effects: Add filters, frames, or effects to your video by tapping on the magic wand icon.
- Switch Camera: Use the flip camera button to switch between the front and rear cameras during your live broadcast.
d. Go Live
- Start Broadcasting: When you’re ready, tap the “Start Live Video” button. You’ll be live to your selected audience.
- Engage with Viewers: As viewers join, greet them, respond to their comments, and answer questions in real-time.
- Use Features: Use Facebook’s interactive features like adding polls, sharing your screen (on some devices), or bringing viewers onto your live video.
e. End Your Live Video
- Finish the Broadcast: When you’re ready to end the live session, tap “Finish” in the bottom right corner.
- Save and Share: After ending your live video, you can choose to post it on your timeline, save it to your device, or delete it.
Using a Computer
a. Start Your Live Video
- Log In to Facebook: Open your web browser, go to Facebook, and log in.
- Navigate to Live Video: Go to your profile, page, or group. Click on the “Live Video” option in the post creation area or under the “Create” tab on the left sidebar.
b. Set Up Your Live Video
- Choose How to Go Live: Select either “Go Live Now” or “Schedule a Live Video” if you want to broadcast at a later time.
- Title and Description: Enter a title and write a description for your live stream.
- Camera and Audio Settings: Choose your camera and microphone from the options provided. Test to ensure everything works properly.
c. Customize Your Live Video (Optional)

- Screen Sharing: On a computer, you can share your screen, which is useful for presentations, tutorials, or showing specific content.
- Streaming Software: If you’re using professional streaming software (like OBS), choose the “Use Stream Key” option to connect your software to Facebook Live.
d. Go Live
- Start Broadcasting: Click the “Go Live” button to start your live broadcast.
- Interact with Viewers: Monitor comments and engage with your audience by responding to questions and acknowledging their participation.
e. End Your Live Video
- Finish the Broadcast: Click “End Live Video” when you’re done.
- Save and Post: After the live session, choose to post the video to your timeline, save it, or delete it.
Post-Live Actions
a. Promote the Replay
- Share the Replay: Once your live session ends, Facebook automatically posts the replay on your timeline or page. Share it across other social media platforms to reach those who missed it.
- Highlight Key Moments: Use Facebook’s editing tools to highlight key moments from your live stream and share them as standalone clips.
b. Analyze Performance
- Review Analytics: Use Facebook Insights to analyze the performance of your live video. Look at metrics like view count, engagement, and peak live viewers.
- Respond to Comments: Continue engaging with viewers by responding to comments that come in after the live session ends.
Conclusion
When you’re ready to go live, open the Facebook app on your mobile device or navigate to the Facebook website on your desktop. On your profile, page, or group, look for the “Live Video” option. Click or tap on it to access the live video setup screen. Here, you can add a compelling title and description for your live video, which will inform potential viewers about the content of your broadcast.
If you’re looking to enhance the impact of your live videos, Buy Live Views Premium service. Our Expert team can help Boost your Facebook live sessions with real audience engagement through genuine, organic strategies that are 100% legal and reliable. We focus on helping you Reach your target audience instantly, ensuring your live broadcasts attract and engage the viewers you need.
By choosing our service, you gain access to proven methods that increase the reach and effectiveness of your live videos. Let us help you create and promote live broadcasts that captivate your audience and drive meaningful engagement.